Tuesday, 27 March 2018

Escape Studios: Group Project 1


Stage 1 - Concept

Group:
Aaron - Director / Editor / Sound Designer / Animator
Maria - Producer / Storyboarder / Animator
Piotr - CG Supervisor / Rigger / Animator
Nicole - Art Director / Motion Graphics / Animator


Idea Brainstorming:

- Brainstormed different ideas based on Teasers we liked
- We particularly liked the Teaser for the Incredibles, because of it's basic concept yet effectiveness. The idea of doing several gags based on one idea seemed quite fun.


- We eventually settled on the concept of a little girl having to hide a baby dragon in her room;
      - There were high quality rigs available for this concept, and were of the same style
      - The concept relied on only one set, allowing us to focus on developing our animation skills

- While a script was being developed by the director, we brainstormed different ways the girl could hide the dragon. Below are some of the development sketches, looking into how the dragon would move and behave in response in a fun way.
     -e.g. Would we show the dragon come out of hiding in the teaser? e.g. from her backpack?
             Would the dragon scramble around to avoid her? Climb on the lights? Climb on her?
             Would the dragon be playful or fearful?


- To make sure that we got the best idea of what sort of characters and situations we were working with to be both consistent, and to make sure that the characters actually had believable motivations; the director made a quick synopsis of the first act of the story.                                                            


Scripts and Storyboards:

- After brainstorming different ideas together, the director compiled a script to trial in storyboarding.


Script Draft

- We then made thumbnail-sized rough storyboards to quickly visualize the layout.


Thumbnail Storyboards


- Then over the weekend, the rough animatic was polished to make our idea clearer for presenting to our peers for feedback.

1st Animatic


- After feedback, we tried to refine the script to make the story clearer.


Final Script


Final Animatic

Production


Stage 2 - Pre-Production

Character Prep:


- As the Teaser outline was being refined, we were preparing our two rigs for Animation, Josh Sobel's Kayla and Arc rig.


- However as we needed a baby dragon, and there was a lack of such rigs and models available, we had to compress Arc's rig to get the design we wanted.

Adapting Josh Sobel's Arc Rig for 'Littlewing'

Final Look of LittleWing

Layout:

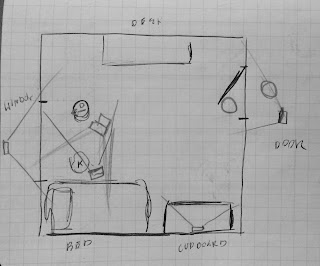
- Moving in Pre-Production, we begun to plan the set of the bedroom in Maya. Below is a quick draft of the floor plan and camera placement.


Floor Plan

Layout


Lighting Tests:

- Here are some of the various Lighting Tests done between the breaks we had from animating.


Stage 3 - Production

Shot Allocation


Thumbnailing:

- Below are some samples of the thumbnails we prepared before starting animation in Maya.

Shot1A and B Thumbnails

Shot4A Thumbnails

A small sample of some of the reference filmed to help with shot timings
 
Shot4A Head Shake Reference

Shot6A and B Thumbnails

Animation:

- Below is a sample of what our Dailies would look like. We would update the animatic with each shot's current progression, to ensure people were judging the Teaser's effectiveness as a sequence, and not as individual shots.


- When assessing shots individually within our own group, we would use SyncSketch to highlight any feedback, errors or suggestions.

- Here is an example of the progression of Shot 5A on SyncSketch
https://syncsketch.com/sketch/a6de082887c2/#363444

Set Design

- After the main animation was done, we used assets gathered in pre-production to help flesh out the scene more.


Final Product:


BONUS:


Thursday, 15 February 2018

Escape Studios: Specialism Exercise

Planning:

For the Final Submission of our Animation Specialism unit, I wanted to practice doing an acting with a dialogue.
I chose a piece of dialogue from Birdman I quite liked, as it had a lot of opportunities to practice emotional changes and animating breaths.

As I had changed my idea rather late in the Unit, I decided to keep the concept for this one simple.

My previous shot had gotten too ambitious and complicated, and as lots of time was spent brainstorming concepts for it, I wasn't as far enough into the blocking stage as I wanted to be.
Thus in order to meet the deadline, I decided to use my back-up choice, and have the character mainly sitting on a sofa.

In order to plan the performance, I wrote out the dialogue and tried imaging what subtext could possibly be behind it. I also tried hard to get in the mindset of the character, thinking about what possible backstory she could have.
I would also draw quick thumbnails to help figure out what main pose would describe the overall mood.
I kept my notebook close by throughout, and if I had any ideas, I would quickly jot them down.


Breaking down the Dialogue


Exploring Character History


When I would struggled to draw out thumbnails for the moments between the key poses, I would record some quick reference to explore ideas.
I would let the audio loop several times, and try different approaches to get some sense of timing and action. If I saw any poses I that had potential, I would try to draw them simplified for notes. And if I saw any interesting timing, I would cut the clip and add it to a video where I collected certain motions.
The problem I had here was that I couldn't film one overall take I was satisfied with. Thus the blocking stage took longer that I wanted it to, due to trying to piece together the different things I wanted.


Some thumbnails


Throughout the process if I would become unsatisfied with the progress of the shot, I would go back to shoot reference again. I would also ask for opinions from peers, who would also help record their interpretations.
I also kept a list of notes I always wanted to keep in mind, collected from lectures and talks that where taking place during the assignment time.


Notes

Blocking:

Here are some playblasts of the early stages in blocking.


Initial Layout

Initially the idea was to have a medium shot, in order to focus on the face. But I decided later to have the whole body seen, in order to play with different ways to emphasise the emotions with the body, instead of having the character nearly completely locked in space.


Block Pass

Thanks to feedback and advice for tutors and peers, I would gradually define more the main poses of the shot, which had started off rather vaguely.

Spline Pass


Final:


https://syncsketch.com/sketch/5e9feba7ac57/#338106


Saturday, 9 December 2017

Escape Studios: Creature Performance


Planning:

The task was to create a creature performance within around 2 weeks.

As I wanted to practice using various live action reference to piece together a shot, I went for a realistic VFX style approach for the animation.

To decide what animal I would animate, I trialed several creature rigs with pose testing. In the end I chose a dog, as Truong's ZBrush dog rig felt really comfortable to work with, due to the variety of controls.

Some of the Pose Tests

In order to keep the story simple so I could focus more on studying dog locomotion, I picked the simple concept of a playful dog fetching a ball.

I had a rough idea of the general motions I wanted, so searched and gathered reference online that roughly matched what I imagined (using dogs of a similar build to the rig). By doing this first, I was able to tweak my idea to include any cool movements I came across.
For example, when I came across a video of a dog who repeatedly fell over each time he fetched a stationary ball, I liked it so much I had to try and include it in the animation.

Storyboards/Animatic:

After feeling satisfied with my library of new reference, I picked out my favourite ones and edited them altogether with Adobe After Effects to create a video storyboard, roughly timing the scene.


To then get a better idea of my key poses, I would sketch them out in my notebook as little thumbnails.


Then to solidify my idea, I made a rough animatic in Adobe Photoshop based on the reference and thumbnail sketches. It also allowed me to explore ways to express the playfulness of the dog.


Block

Next step was to start Blocking. At this stage I mainly focused on getting the key poses from the Animatic in the scene.


---------------------------------------------------------------

Near the end of the 1st pass of Blocking, I discovered that Truong had updated his dog rig with even more controls, which would become really helpful with overlapping.  However when transferring the animation from the old rig to the new rig, I noticed that the newer one had some model deformations.

I was thankfully able to contact the Truong, and ask if it was possible to fix them to behave similar to in the old rig. I would send screenshots of my block pass with both rigs aside each other, which helped reveal when and where the model would deform. Truong would then kindly update it and ask for more feedback, which ultimately led to fixing issues such as stretching the legs far out would change the volume of the torso.

The screenshots I sent of the deformations


For my 2nd pass of Blocking, I keyed at much closer intervals to help prepare for the Splining. I used the reference much more closely in this pass to build the shot.
Initially I thought the dog was going to run straight to the ball in a curved path, but this turned out to feel quite unatural after testing. I therefore decided to add in a slide to help the dog do a sharp turn after doing some reference research into Dog Agility.


The only reference I could find of a dog doing a slide on a sharp turn was in the clip above. Despite being blurry, it helped me adjust the shot for the 2nd Block Pass below.


Spline

In the 1st Pass of the Spline, wanted to only focus on the main controls, such as body, limbs and neck. Additionally I decided to cut off the tail in order to save time animating as the deadline drew closer.


Final Submission

The Final Submission is ultimately the 2nd Spline Pass, with a basic render in the Viewport. This is where I added details, such as animating the paws, ears and using jiggle controls to try and simulate muscles moving.


Here's the Final Submission along the main reference used


Monday, 30 October 2017

Escape Studios: 11 Second Club, October 2017


Planning:

The process began by brainstorming numerous ideas on paper. I was determined to not open Maya until I was absolutely set on a concept, so as to not waste time with wasted assets and resources.

I found it quite difficult to settle on an idea for this month's 11 Second Club audio, as I wanted to find a decent explanation for each sound. Monday to Thursday was spent circling around ideas, by playing around with quick sketches as I tried to think of a concept by the end of the week.

Below are some examples of the primitive sketching I would do to try out a concept. Not exactly Michelangelo quality, but it made sense to me and proved helpful.
 

----------
BONUS: Ideas experimented with:

- Detective duo investigates gruesome crime inside a garage
- Girl carrying fragile antique in old elevator, which halts abruptly
- Rebellious student tries to sneak out of school, only for the Teacher to slam the door in time and send her to detention
- Spy crawling through a vent, which then collapses
- Explorers travel across bridge, which then collapses
- Guy raids fridge at night, girlfriend catches him
- Stressed out Animator angrily struggles to come up with idea for 11 Second Club (seriously)
----------

I was unsure whether I should be realistic with explaining the sounds, or use them to exaggerate an event that wouldn't normally use such sounds.

Nevertheless, after a thorough brainstorm on Friday's train ride, I settled on the idea of a prisoner being sent to her cell by her guard.


Storyboards/Animatic:

I decided to try a new approach to storyboarding. Instead of doing it on paper, I tried drawing directly in Maya with Grease Pencil. This was as I wanted to ensure no time was wasted readjusting 2D storyboards in the 3D environment if the dimensions didn't match well.
It turned out to be very comfortable and efficient for me. I gathered assets to make a basic Prison set, and was able to make a rough animatic.

Below is a playblast of the animatic in Maya. The idea was that two guards escort a prisoner to her cell and throw her in.


Thumbnails/Blocking

As I was trying to refine the idea, and how to pose the character and frame each shot, the deadline came closer very quickly. And as I had struggled so long to actually pick an idea, I didn't want to waste any further time and simplified the shot.
I chose to use just one flat camera angle to avoid my indecisiveness, and to shrink the set so that I could focus the scene in just one contained space.

At this point I had already imported the character rig and began to roughly block it to the beats of the animatic.
The original idea was that the guard pushes the prisoner inside the cell onto the floor. I wanted to find some decent reference of someone falling in a similar way so I could observe the physics, not just pantomime, and found this crazy video of a monkey jump-kicking a man from behind!

Below is the stage of the shot at this point, and the cool monkey jump-kick reference. The timing was still in the works, the main focus was just getting key poses in there.


However after changing the camera angle, I wanted to change the animation as all the action was happen in one small part of the screen. Thus I changed the concept of her being pushed down to her walking across the room to her bed.
This was also motivated by the fact that I finally discovered a way to explain the last set of sounds in the audio (some rummaging noise, then some sort of lid closing?). I had a standard toilet on the opposite side of the prison set, so I thought maybe it would be funny if a rat just popped up from it. and she react by shutting the lid on it.

To help plan her movements and mood I did some crude thumbnails, seen below:


I also filmed several references as I tried to figure out the basic motion.
Below is a snippet of some last minute shoots I would do as I changed the concept.


Block to Spline

Now that the basic motion was planned, I had new block to work with, as seen below.


From then on I began the splining process in sections. I got some great feedback from peers and tutors throughout the process as I ran into obstacles. Below are some of the comments that really helped me out.

- Don't be afraid to exaggerate
          -Easier to exaggerate to the extreme, then dial it back
- Always keep in mind where the weight is
- Face is one cohesive unit
- Don't have too much motion from more than one character at a time
- K.I.S.S

Below is the 1st Pass of the Spline:


After submitting the 1st Pass for review, I got some tips on having the clip not end so abruptly. It was advised to have the prisoner react in a more intense, disgusted way and to have the rat scurry or leave in some way.
Did some quick experimenting with what I could as the deadline loomed in on the same day, seen below.


Final Submission


BONUS:

Here's a weird addition I made to the shot at one point!


Wednesday, 5 July 2017

2017 Animation Reel


Rigs used:

MooM by Ramtin Ahmadi
Malcolm 2.0 by AnimSchool
Horse by Carlos Contreas
Dog by rroobboo 999
Cartoon Horse by Joel L. Anderson
Stewart by Animation Mentor

Music"Piano Wire" by Ronald Jenkees

Thursday, 1 June 2017

1st Year University Work


I've just finished the 1st year of my undergraduate course, The Art of Computer Animation, at Escape Studios.

In the last half of the year, all of the undergraduate students from all the courses were set on four 4-week courses: 3D VFX, 2D VFX, Game Art, and Computer Animation. Therefore everyone would build a good set of 3D Generalist skills.

Along with general classwork and exercises, we were assigned a final project for each course near the end. Below are my submissions for the courses.

Can't wait for next year, when we'll really get to delve into Animation!


Computer Animation - Animating in Maya

         Animatic:                                                                              Blocking:


                                   Final Animation:


2D VFX - Compositing in Nuke

Before and After:


3D VFX - Modelling, UV Mapping and Texturing in Maya and Photoshop


Game Art - Modelling, UV Mapping, Texturing and Effects in Maya, Photoshop and Unreal Engine